

Views: 0 Author: Site Editor Publish Time: 2026-03-31 Origin: Site


If you want to know how to replace a condensate pump step by step, you’ve come to the right place. First, make sure you stay safe by turning off power and grabbing the right tools. You’ll remove the old pump, put in the new one, and check that everything runs smoothly. This guide works for both home units and industrial models like the SPMC NLO Vertical Can Type Condensate Pump. You can handle condensate pump replacement, whether you’re a DIYer or part of a maintenance team. Before you start, take a moment to read every step so you avoid common problems like power issues, float switch troubles, clogs, or leaks.
Always turn off the power before you start. This keeps you safe and stops electrical shocks.
Get all the tools and safety gear you need before you begin. Being ready makes the job easier and faster.
Use a step-by-step plan to remove the old pump. Put in the new one and hook up all the tubes and wires. This way, you make fewer mistakes.
Test the new pump for leaks and to see if it works right after you finish. Finding problems early can stop bigger issues later.
Check your pump often to help it last longer and work better. Simple checks can stop expensive fixes in the future.

Before you dive into condensate pump replacement, you need to make sure you’re working safely and have everything ready. These steps work for both home systems and industrial pumps, including the SPMC NLO Vertical Can Type Condensate Pump. Let’s break down what you need to do before you start.
Safety comes first! You don’t want any surprises when you’re working with electrical equipment. Here’s how you can safely shut off power to your pump:
Find your HVAC or pump’s breaker in the electrical panel and switch it off.
If your unit plugs into an outlet, unplug it too.
Place a sign or note on the breaker so no one accidentally turns it back on while you’re working.
Double-check that the power is off before you touch anything.
Tip: Some people say "turn off the fuse" when they mean to shut off the breaker. Either way, make sure the power is completely off before you move on.
You’ll want to have all your tools and safety gear ready before you start. This helps the job go faster and keeps you safe. Here’s a handy table to help you get organized:
Safety Equipment | Tools Required |
|---|---|
Heat-resistant gloves | Adjustable wrenches and socket set |
Eye and face protection | Pipe wrench |
Protective footwear | Flathead and Phillips screwdrivers |
Pipe sealant or PTFE (Teflon) tape | |
Electrical lockout/tagout equipment | |
Multimeter for electrical checks |
You might also need:
A drill with screwdriver bits
Pipe cutter or saw
Hose clamps and tubing
Level
Tape measure
Electrical tape and wire connectors
Condensate pump kit (with pump and drain tubing)
Now, get your workspace ready. A little prep goes a long way! Here’s a simple checklist to follow:
Make sure the power is off.
Find the condensate pump and check where the drain line connects.
Plan the route for your drain line. It should slope downward so water flows out easily.
Get your tubing ready and attach it to the pump. Secure it tightly.
Fasten the drain line so it doesn’t kink or sag.
If you need to drain outside, drill a hole for the tubing and seal it up.
Once you finish installing, test the pump to make sure it works.
Do a final check for leaks and make sure all connections are tight.
Note: Taking time to prep your area helps you avoid messes and makes the whole process smoother.
Now you’re set for a safe and smooth condensate pump replacement!
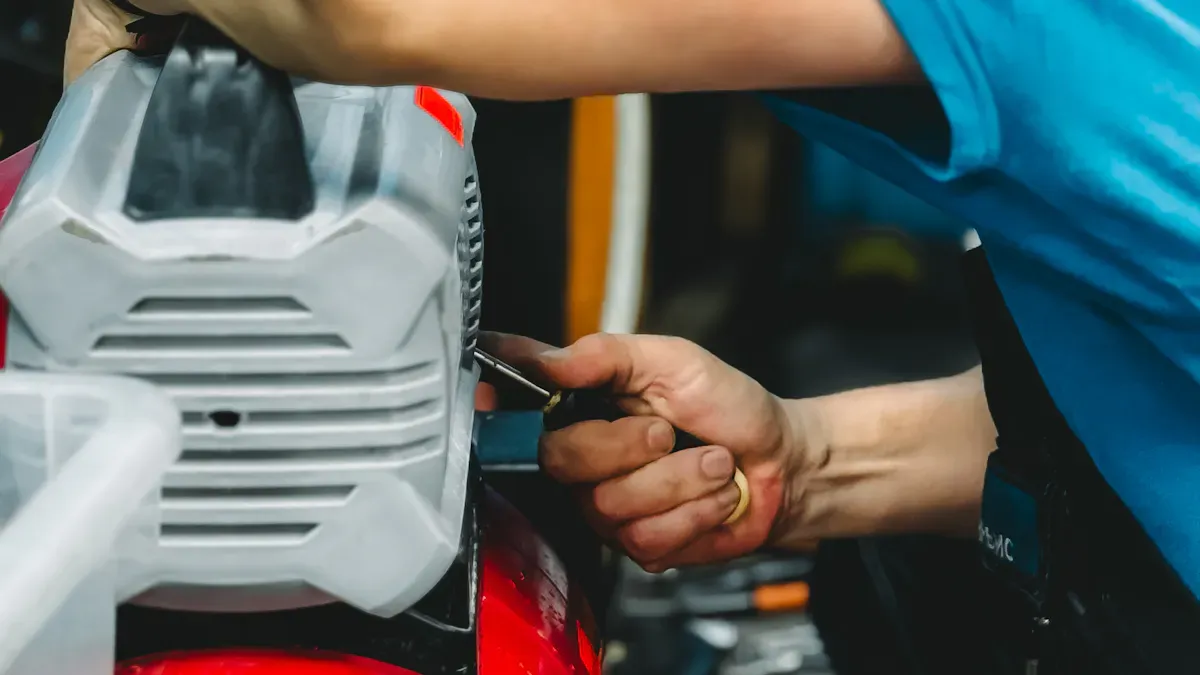
When you need to change a condensate pump, start by disconnecting the tubing and wires. This step is important because it keeps the other parts safe. It also helps stop leaks when you take out the old pump. The main steps are the same for both home and industrial pumps. Some pumps, like the SPMC NLO Vertical Can Type Condensate Pump, are easier to work on. They have designs that help you get to the parts quickly.
First, find the discharge tubing on the pump. Use a wrench or pliers to loosen the clamps. Take off the tubing and catch any water that comes out. If your pump has a float switch or wires, disconnect them gently. Use a screwdriver or your hands to loosen the screws. Pull the wires out with care.
Industrial pumps like the SPMC NLO often have quick-release electrical parts. This makes the job faster and easier. Always check that the power is off before touching wires. This keeps you safe from shocks.
After you disconnect the tubing and wires, lift out the old pump. You may need to remove screws or brackets first. Use a screwdriver or socket wrench to do this. If the pump is stuck, tap it gently with a rubber mallet. You can also wiggle it to loosen it.
The SPMC NLO pump has a design that makes it easy to take apart. You can reach inside the pump without much trouble. Be careful not to break any pipes or other parts. If the pump is heavy, ask someone to help or use a lifting tool.
Now it’s time to put in the new pump. Check that the spot is clean and flat. Place the new pump in the right place. Line it up with the holes for mounting. Use a wrench or screwdriver to attach the pump tightly.
Next, put the flexible tubing into the inlet and outlet ports. Make sure the tubing fits well and is not bent. Use clamps to hold the tubing in place and stop leaks. The SPMC NLO pump lets you connect the lines quickly.
Connect the wires to the new motor. Follow the wiring diagram that comes with your pump. Make sure each wire goes to the right spot. Tighten the screws but do not make them too tight.
Check all the connections, screws, and tubing again. Turn the power back on and watch the pump work. Look for leaks or strange sounds. If everything looks good, you have finished installing the new condensate pump.
You’re almost done! Now, you need to reconnect the tubing and power to your new pump. Here’s a simple checklist to help you finish strong:
Attach the return lines to the inlet of the receiver. Use a gate valve for each return and a union or flange joint next to the receiver.
Connect the discharge line to the boiler. Add a union, a spring-loaded check valve, and a gate valve. Place the check valve as close to the pump as possible.
If your discharge line is longer than 50 feet, use a pipe that’s one size larger.
Make sure all pipes fit well and don’t put strain on the pump.
Reconnect the electrical components. Connect the power cord to the float switch or starter using the right wire size and conduit. Always include a fused main line switch for safety.
If you need to wire the pump for a different voltage, check the motor instructions. For polyphase motors, add a phase protector switch to avoid burnout.
Tip: Double-check every connection before you reconnect the electrical components. This helps prevent leaks and keeps your system safe.
It’s time to test for leaks and see how your new pump works. Turn the power back on and watch the pump run. Here’s what you should look for:
Listen for odd sounds like clicking, humming, or rattling.
Check for water pooling near the base of your unit.
Make sure water drains out smoothly and the system doesn’t shut down.
Sniff for musty or moldy odors, which can mean excess moisture.
Test for leaks at every joint and connection.
If you spot any problems, turn off the power and fix them right away. A good test for leaks now can save you from bigger issues later.
Want your new pump to last for years? Regular maintenance is the secret. Here’s how you can keep your system in top shape:
Watch for shaft wear, vibrations, and low lubrication levels.
Check that the pump stays aligned to avoid extra wear.
Run the pump close to its best efficiency point for better performance.
Never let the pump run dry unless it’s designed for that.
Use smart technology for real-time monitoring if you can.
Simple tasks like cleaning and inspecting the pump can add years to its life. Pumps with little maintenance break down faster and cost more in the long run.
If you use an SPMC NLO Vertical Can Type Condensate Pump in an industrial setting, you can always reach out to SPMC’s technical support for expert help. They’ll guide you from installation to long-term service.
Note: Regular maintenance after condensate pump replacement means fewer surprises and more reliable operation.
You now know the main steps for changing a condensate pump. Always stay safe and test your new pump before you finish. Here are some important tips to keep in mind:
Look up local rules for getting rid of old pumps.
Choose a pump with enough lift and twice the needed power.
Add an overflow shutoff switch for more safety.
Clean and check your system often to find leaks or clogs early.
If you have wiring trouble, a burned-out motor, or a hard job, call a pro.
Environmental Impact | Description |
|---|---|
Contamination of Water | Oil and dirt can get into water if not thrown away right. |
Soil Contamination | Bad stuff can hurt the ground if condensate leaks out. |
Legal Issues | Throwing away pumps the wrong way can get you in trouble. |
Taking care of your pump helps it last longer, saves money on repairs, and keeps your system working well. If you are not sure what to do, ask a pro or SPMC’s technical support for help.
You should check your pump every year. Most pumps last 3 to 5 years. If you hear strange noises or see leaks, it’s time to replace it.
If you have basic tools and follow safety steps, you can install it. For industrial setups, you may want help from a pro or SPMC’s technical support.
Look for these signs:
Water leaks
Loud noises
Pump won’t start
System shuts down often
If you see any of these, plan to replace your pump soon.
Most pumps self-prime. You just fill the tank with water before starting. Check your manual for special steps.


